
Docker+Nginx를 활용한 Application Proxy 구조
기존에 도커를 활용하지 않던 서비스의 서버를 이관해야하는 상황이 생겨서 기회삼아 도커를 활용한 Proxy 구조를 구축하기로 하고 시도를 해보았습니다. 복잡한 과정은 제외하고 간단히 어떤 방식으로 Docker와 서비스 간의 Proxy 구조를 구축했는지 정리하고자 합니다.
이전 Docker Install 포스팅을 통해서 도커와 docker-compose를 설치하는 방법은 이미 설명했습니다.
때문에 docker, docker-compose가 설치 되어있다는 가정 하에 작성하는 포스팅이니 참고 바랍니다.
Reverse Proxy 설계
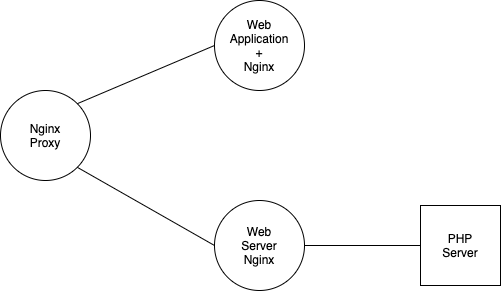
서비스하고자 하는 구조는 아래와 같이 간단합니다.
로드밸런서의 역할을 하는 nginx 와 web application의 web server 역할을 대체해줄 nginx, 그리고 php server에 reverse proxy 역할을 해줄 nginx 가 있습니다.
web application의 경우에도 자체적으로 web server 역할을 할 수 있는 ssr 방식의 서비스라면 reverse proxy를 할 nginx, ssr web server 이렇게 더 구분이 되겠네요.
이렇게 분리가 된다면 클러스터링 된 web server에 연결된 nginx에서 분산 처리가 가능한 구조로 확장하기 편해집니다.
그러면 이 설계를 그대로 docker 구조로 만들어보겠습니다.
서비스 폴더 구조 설계
우선은 상위에서 docker-compose.yml을 작성하고 해당 폴더에서 volume으로 활용할 서비스 폴더 구조를 잡아야합니다.
volume을 활용하는 간단한 이유를 설명하자면, 우리가 nginx.conf 파일을 수정한다고 했을 때 일일히 docker 내부로 접근해서 변경하기는 굉장히 귀찮은 일입니다.
그래서 외부에서 작성을 하고 volumes를 활용해서 연결한다면 심볼릭 링크가 걸린 것처럼 동작합니다.
즉, docker 외부에서 변경한 파일이 docker 내부에 적용된다. 이렇게 생각하시면 됩니다.
전체 폴더 구조
docker-compose.yml
/web
  /application
  /server
/nginx
  /application
    default.conf
  /server
    default.conf
  nginx.conf
web(Vue, React…)
vue, react 등으로 개발된 웹 어플리케이션이라면 보통 빌드된 폴더로 dist가 있을 겁니다.
이 폴더만 웹 서버로 동작시키면 간단하게 어플리케이션을 실행시킬 수 있습니다.
server(PHP)
PHP를 기준으로 작성하고 있으니 우선은 php 서버겠죠? 이 경우에는 라이브러브 참조 등을 위해 전체적인 폴더를 volumes에 연결시켜줘야 합니다.
nginx
전체적인 로드밸런서 역할을 할 nginx의 conf 파일과 각각의 웹 어플리케이션, PHP 서버에 reverse proxy 역할을 해줄 nginx.conf 혹은 default.conf 파일이 필요합니다.
docker-compose.yml 작성
version: '3.8'
services:
    nginx:
        image: nginx:latest
        container_name: 'nginx'
        ports:
            - '80:80'
            - '443:443'
            - '8000:8000'
        restart: always
        volumes:
            - ./nginx/nginx.conf:/etc/nginx/nginx.conf
            - ./nginx/ssl:/etc/nginx/ssl
    web:
        image: nginx:latest
        expose:
            - '3000'
        restart: always
        volumes:
            - ./web/application/dist:/usr/share/nginx/html
            - ./nginx/application/default.conf:/etc/nginx/conf.d/default.conf

    server:
        image: nginx:latest
        expose:
            - '8080'
        restart: always
        volumes:
            - ./web/server:/var/www
            - ./nginx/server/default.conf:/etc/nginx/conf.d/default.conf

    php:
        image: php-fpm7.3
        restart: always
        volumes:
            - ./web/server:/var/www
        working_dir: /var/www
        expose:
            - '9000'
image
우선 image로 설정된 nginx:latest는 docker hub를 통해 가장 최신 버전의 nginx image를 가져옵니다.
php의 경우에는 버전에 따라 의존성 문제가 발생할 수 있으므로 현재 자신이 개발했던 php 버전에 맞게 image를 가져오면 됩니다.
다만, 본인의 서비스 의존성에 있는 라이브러리가 기본 image에 없는 경우 Dockerfile을 작성해서 설치 명령어를 실행해줄 필요가 있습니다.
아니면 docker hub에는 많은 분들이 평균적으로 자주 쓰이는 라이브러리까지 포함된 php image를 올리는 경우도 있으니 잘 선택해서 활용하셔도 무방합니다.
ports, expose
ports와 expose의 차이점을 간단하게 설명하자면,
ports는 호스트 네트워크의 포트를 도커 포트로 연결해주기 위한 방식(docker-proxy)이고 expose를 도커에서 도커 포트로만 연결이 가능한 방식입니다. (물론 이 경우에는 같은 도커 네트워크 그룹 안에 있어야 합니다.)

위 이미지를 보면 nginx container에 ports를 사용하여 노출된 80, 443, 8000 포트는 실제 호스트 네트워크에 구동 중이라는 것을 알 수 있습니다.
하지만 web, server, php에서 expose로 노출한 3000, 8080, 9000 포트는 호스트 네트워크 상에 노출되어 있지 않죠.
이런 방식을 활용해 외부에는 노출하지 않고 proxy를 활용한 같은 네트워크 그룹 내의 도커끼리만 reverse proxy하는 구조를 만들 수 있습니다.
volumes
volumes의 활용은 하기 나름이긴한데 굳이 필요하지 않은 폴더 범위까지 포함할 필요는 없고 내가 활용하고자 하는 범위를 잘 정해야합니다.
web application 같은 경우에는 빌드된 dist 폴더만 있다면 웹 서버를 활용해 구동시킬 수 있기 때문에 프로젝트 전체를 volumes 범위에 넣지 않습니다.
php의 경우에는 그와는 다르게 필요한 범위가 더 넓기 때문에 volumes가 서비스 전체 폴더를 가져오는 구조로 되어있습니다.
nginx.conf, default.conf 작성하기
이제 proxy 역할을 해줄 conf 파일을 작성해보겠습니다.
/nginx.conf
user nginx;
worker_processes 1;
error_log   /var/log/nginx/error.log warn;
pid         /var/run/nginx.pid;

events {
    worker_connections 1024;
}

http {
    include         /etc/nginx/mime.types;
    default_type    application/octet-stream;

    log_format  main  '$remote_addr - $remote_user [$time_local] "$request" '
                      '$status $body_bytes_sent "$http_referer" '
                      '"$http_user_agent" "$http_x_forwarded_for"';

    access_log  /var/log/nginx/access.log main;

    sendfile    on;
    keepalive_timeout   65;

    upstream docker-app {
        server web:3000;
    }

    upstream docker-server {
        server server:8080;
    }

    server {
        listen 80;
        server_name domain.com;

        location / {
            return 301 https://$host$request_uri;
        }
    }

    server {
        listen 443 ssl default_server;
        server_name domain.com;

        location / {
            proxy_pass  http://docker-app;
            proxy_http_version  1.1;
            proxy_redirect      off;
            proxy_set_header    Host $host;
            proxy_set_header    X-Real-IP $remote_addr;
            proxy_set_header    X-Forwarded-For $proxy_add_x_forwarded_for;
        }

        ssl_certificate     /etc/nginx/ssl/ssl.crt;
        ssl_certificate_key    /etc/nginx/ssl/ssl.key;
        ssl_session_cache    shared:SSL:1m;
        ssl_session_timeout  5m;
        ssl_ciphers  HIGH:!aNULL:!MD5;
        ssl_prefer_server_ciphers  on;
    }

    server {
        listen 8000 ssl;
        server_name domain.com;

        location / {
            proxy_pass  http://docker-server;
            proxy_http_version  1.1;
            proxy_redirect      off;
            proxy_set_header    Host $host;
            proxy_set_header    X-Real-IP $remote_addr;
            proxy_set_header    X-Forwarded-For $proxy_add_x_forwarded_for;
        }

        ssl_certificate     /etc/nginx/ssl/ssl.crt;
        ssl_certificate_key    /etc/nginx/ssl/ssl.key;
        ssl_session_cache    shared:SSL:1m;
        ssl_session_timeout  5m;
        ssl_ciphers  HIGH:!aNULL:!MD5;
        ssl_prefer_server_ciphers  on;
    }
}
사실 이 포스팅에서는 upstream이 필요한 구조는 아닙니다만, 실제 서비스에서는 upstream을 활용했기 때문에 그대로 작성했습니다.
docker-compose를 활용한 nginx의 경우에는 아래와 같이 docker-compose.yml에 services name을 그대로 upstream에 활용할 수 있습니다.
# docker-compose.yml
services:
    web: // 이 명칭을...
        image: nginx:latest
        expose:
            - '3000'

# nginx.conf
upstream docker-app {
    server web:3000; // 여기에 활용 가능!
}
제가 구축했던 서버는 443 port를 기본으로 하는 https 서버였기 때문에 ssl 설정이 포함되어 있습니다.
ssl 서버 설정 시에는 nginx에 다음과 같은 설정 등이 추가로 필요합니다.
server {
    listen 443 ssl default_server; // listen port 뒤에 ssl이 포함되어 있다면 ssl 서버라는 것을 의미
    ...

    ssl_certificate     /etc/nginx/ssl/ssl.crt; // ssl 인증 파일
    ssl_certificate_key    /etc/nginx/ssl/ssl.key; // ssl 인증키
    ssl_session_cache    shared:SSL:1m;
    ssl_session_timeout  5m;
    ssl_ciphers  HIGH:!aNULL:!MD5;
    ssl_prefer_server_ciphers  on;
본인의 서버가 그냥 단순히 http 서버라면 위의 설정 등을 제거해주면 되겠죠?
기본적인 방식은 DNS에서의 접근은 https로 연결되고 내부 docker 서비스 간의 연계는 http로 reverse-proxy 되는 방식입니다.
proxy_pass로 접근하는 upstream server가 정상적으로 구동되려면 말 그대로 proxy로 연결할 해당 서버도 구동되어 있어야 합니다.
추가적으로 application, server용 conf 파일도 작성해보겠습니다.
/application/default.conf
nginx는 별도의 nginx.conf 파일을 두지 않으면 /conf.d/default.conf 파일을 기준으로 구동 됩니다.
그래서 docker-compose.yml에서 volumes의 설정이 /etc/nginx/conf.d/default.conf 이쪽에 연결되어 있는 걸 확인할 수 있습니다.
물론 별도의 nginx.conf 파일을 작성해서 연결하겠다면 그렇게 설정을 바꾸셔도 무방합니다.
이제 default.conf의 설정을 확인해보겠습니다.
server {
    listen      3000;
    server_name  domain.com;

    location / {
        root   /usr/share/nginx/html;
        index  index.html index.htm;
        try_files $uri $uri/ /index.html?$args;
    }

    error_page   500 502 503 504  /50x.html;
    location = /50x.html {
        root   /usr/share/nginx/html;
    }
}
3000번 포트로 접근했을 시 root의 경로가 /usr/share/nginx/html로 설정되어 있습니다.
그리고 index 설정을 기준으로 해당 폴더의 index.html 혹은 index.htm을 실행하게 되어있죠.
docker-compose.yml에서 우리는 application의 빌드된 dist 폴더를 volumes를 통해 위 경로로 링크해줬습니다.
그리고 로드밸런서 역할을 하는 nginx.conf에서는 443으로 접근했을 시 proxy-pass를 통해 해당 application nginx 3000 포트로 reverse-proxy 되게 설정해줬습니다.
즉, https://domain.com 으로 접근하면 443 포트를 https의 default server로 설정했기 때문에 웹 어플리케이션 화면을 띄울 수 있게 된거죠.
여기까지 작성을 했다면 클라이언트 화면까지 띄울 수 있게 된 겁니다.
그리고 이젠 API 서버 역할을 하는 PHP 서버도 띄워야 이 어플리케이션이 정상적으로 동작하게 되겠죠.
/server/default.conf
server {
    listen      8080;

    server_name  domain.com;
    root /var/www/public;


    location / {
        index index.html index.htm index.php;
        try_files $uri $uri/ /index.php?$query_string;
    }

    location ~ \.php$ {
        try_files $uri =404;
        fastcgi_split_path_info ^(.+\.php)(/.+)$;
        fastcgi_pass php:9000;
        fastcgi_index index.php;
        include fastcgi_params;
        fastcgi_param SCRIPT_FILENAME $document_root$fastcgi_script_name;
        fastcgi_param PATH_INFO $fastcgi_path_info;
    }
}